Changing your own car oil is one of the most accessible and rewarding DIY maintenance tasks you can perform. By following a structured process, you can complete a clean, professional-grade oil change right in your garage or driveway in about 30 to 45 minutes.
The Ultimate Toolbox What You Need Before Starting
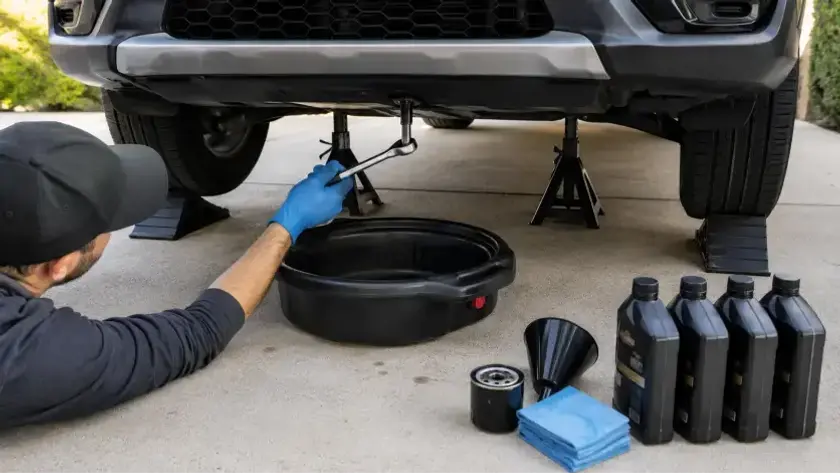
Before turning a single bolt, gather your equipment and consult your vehicle’s owner’s manual to verify your engine’s exact oil capacity and viscosity weight (such as 5W-20 or 0W-20).
Step-by-Step Oil Change Execution
Prep and Safely Lift the Vehicle
Drive your car around the block for 5 minutes to warm up the engine slightly warm oil has lower viscosity, meaning it drains much faster and pulls away more internal carbon debris than freezing, stagnant oil. Park on a perfectly level concrete surface, engage your parking brake tightly, and raise the front of the vehicle using a hydraulic floor jack.
CRITICAL SAFETY WARNING: Never creep under a vehicle supported solely by a hydraulic
floor jack. Hydraulic seals can fail instantly. Always lower the vehicle securely onto heavy-duty steel jack stands and place wheel chocks firmly behind the rear tires.
Open the Top Fill Port and Position the Pan
Pop your hood and locate the oil fill cap on top of the engine valve cover. Remove it completely. Breaking this internal vacuum allows the dirty oil to drain smoothly from the bottom of the engine, preventing a glugging effect. Move underneath the chassis, locate the metal engine oil pan, and position your oil catch pan directly beneath the drain plug.
Drain the Dirty Engine Oil
Using the correct size socket wrench, loosen the drain plug bolt by turning it counterclockwise. Once it is loose, unscrew it the rest of the way by hand. Maintain a slight inward pressure on the bolt as you turn it so oil doesn’t leak onto your fingers, then pull it away quickly. Let the oil drain completely into the pan for about 10 minutes until it slows to a very faint trickle.
Reinstall the Drain Plug and Crush Washer
Wipe the threads of the oil pan and the drain plug clean using a fresh shop rag. Inspect the plug’s crush washer if it is flattened, scored, or distorted, swap it out for a new one to prevent slow leaks. Re-thread the plug back into the oil pan by hand (clockwise) to ensure it does not cross-thread, then tighten it snug with your socket wrench to factory torque specifications. Do not over-tighten, or you risk stripping out the threads on an aluminum oil pan.
Replace the Old Oil Filter
Reposition your catch pan directly underneath the oil filter. Use your oil filter wrench or specialized pliers to loosen the filter casing counterclockwise. Spin it off carefully by hand, keeping it upright, as it will be filled with heavy, dirty oil.
Take your brand-new oil filter, dip a gloved finger into your fresh oil bottle, and smear a light coating of clean oil across the new filter’s rubber O-ring seal. This ensures a proper seat and prevents the gasket from baking onto the metal engine block over time. Spin the new filter onto the housing by hand clockwise. Once the rubber seal makes solid contact with the metal mounting plate, turn it an additional 3/4 to 1 full turn by hand. Do not use a wrench to tighten a spin-on filter, as over-tightening will crush the gasket or make it impossible to remove during your next service.
Fill with Fresh Oil
Place your clean funnel into the top oil fill hole on the engine. Pour in the exact number of liters recommended by your manufacturer (usually found in the owner’s manual index). Replace the oil fill cap securely.
Check for Leaks and Verify Levels
Start the engine and let it idle for 30 to 60 seconds while keeping a close eye under the chassis. Look carefully around the drain plug and the new filter to ensure no oil is dripping.
Shut the engine off, let the vehicle sit for 2 minutes so the fluid can settle back down into the oil pan, pull the dipstick, wipe it clean with a rag, reinsert it fully, and pull it out again. Ensure the oil line sits perfectly between the two indicator dots or crosshatched marks.
The Critical Filter Function and Steering Alignment Check
A proper oil service is completely incomplete without installing a brand-new, high-efficiency oil filter. The filter captures tiny fragments of carbon, metal filings, and ambient road dirt carried by the circulating oil. Reusing an old, clogged filter forces clean new oil to bypass the filtration element entirely, circulating contaminated oil right back through your pristine engine bearings.
Because an oil service requires raising your car on jack stands, it provides an ideal window to inspect your underlying suspension joints, steering tie rods, and front tires. If your visual inspection identifies uneven tire tread wear, pairing your routine maintenance with a computerized wheel alignment is a highly recommended step. Readjusting your suspension links back to factory specifications eliminates highway tracking drift, maximizes your rolling fuel tracking efficiency, and stops your tires from scrubbing away their rubber prematurely.
Comprehensive Automotive Preventative Solutions
Operating a full-service mechanical ecosystem requires looking at your car’s entire network of components. If you run into unexpected complications while working on your car, or simply prefer to have a professional handle it, a full-service workshop can provide seamless preventative care.
A well-rounded shop floor handles everything required to keep your automobile dependable and safe. If your brakes are squealing or displaying a soft pedal feel, a comprehensive brake repair service will fully restore your stopping confidence. If your vehicle is exhibiting complex running issues, licensed technicians can pinpoint the exact wheel sensor or wiring issue triggering an ABS light or check engine alert.
From restoring crisp, icy airflow with an expert air conditioning service to tracking down complex mechanical faults, comprehensive care saves time. If your manual gearbox is fighting your inputs up steep hills, a specialized clutch repair balances your power delivery. Furthermore, for high-mileage engines, booking a preemptive timing belt repair provides absolute insurance against catastrophic internal engine valve damage.
Complete Control and Everyday Peace of Mind
Allowing old, broken-down engine oil to run past its service life leaves your vehicle highly vulnerable to accelerated cylinder wear, expensive timing chain stretch, and internal engine sludge buildup. Opting for a professional, warranty-approved fluid and filter change completely removes the risk of contamination, keeps your engine running smoothly, and ensures your daily commutes remain efficient and worry-free.
Frequently Asked Questions: how do you change oil
What is the main difference between a wheel alignment and tire balancing?
A wheel alignment corrects the underlying mechanical angles of your steering links and suspension components so that your tires roll parallel to each other and track straight. A professional tire repair service incorporates wheel balancing, which places small weights along the rim flange to correct natural heavy spots within the spinning rubber assembly itself, entirely removing high-speed steering vibrations.
Where should I dispose of my used motor oil and filter?
Never pour old motor oil down household drains, into storm sewers, or onto the ground. Pour your used oil into an empty, sealed plastic jug and take it along with your old oil filter to a certified local recycling depot or an auto parts retail store, where they will collect it completely free of charge.
What is the difference between an oil canister and a cartridge oil filter?
A canister filter is a self-contained metal unit that spins completely off the engine as one piece. A cartridge filter is an exposed, pleated paper element that sits inside a permanent plastic or aluminum housing built onto the engine block, requiring you to unscrew a specialized cap and swap internal rubber O-rings.
Can I use synthetic oil if my car originally used conventional oil?
Yes, modern synthetic oils are fully backwards-compatible with older vehicle engines. Switching to synthetic provides superior internal engine cleansing, cleaner cold-weather startups, and much better high-temperature protection, though you should check for any pre-existing gasket leaks first.
Why is it so important to lubricate the new filter’s rubber seal?
Putting a drop of fresh oil on the new filter gasket creates a proper hydrodynamic seal against the engine block. Without this lubrication, the dry rubber will bunch up, tear, or completely fuse to the engine block under operational heat, creating a major oil leak or making the filter impossible to remove during your next service.
How often should I check my oil level using the manual dipstick?
It is a highly recommended automotive practice to check your engine dipstick at least once every month or before embarking on a long highway road trip. This ensures you catch any minor oil consumption or hidden leaks before the fluid drops to a dangerously low level.
Key Takeaways: how do you change oil
- Warm Drains Better: Always run your engine for 5 minutes before draining your oil; warm fluid flows faster and carries away more carbon deposits.
- Safety Over Everything: Never crawl underneath a vehicle resting only on a jack; utilize heavy-duty steel jack stands and wheel chocks.
- Avoid the Double Gasket: Verify that the old black rubber O-ring came off with your old filter to prevent a catastrophic oil blowout.
- Lubricate the New Seal: Always coat the fresh filter’s rubber gasket with clean oil to ensure a flawless seal and easy removal next time.
- Chassis Inspections: Having your car raised is the ultimate opportunity to look at suspension joints, making a steering alignment highly efficient if uneven tire wear is found.
- Independent Workshop Alternatives: If a DIY change feels overwhelming, booking your vehicle with an established independent repair garage ensures factory-approved parts, certified mechanics, and zero stress.