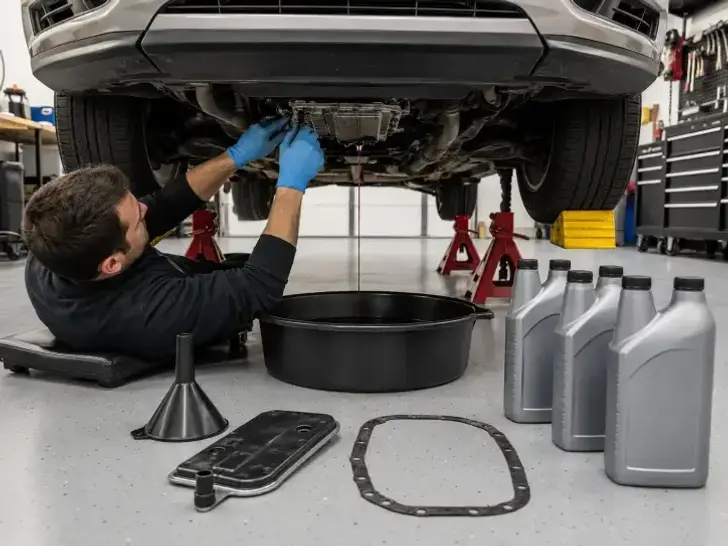
Performing a transmission “drain and fill” is one of the most effective ways to extend the lifespan of your vehicle’s gearbox. While a full machine flush should be left to professional workshops, a standard fluid and filter change can be completed in your garage or driveway in about 1 to 1.5 hours using standard tools.
Note: This guide focuses on standard automatic transmissions with a removable oil pan. Manual gearboxes and sealed CVTs require different procedures.
The Drivetrain Toolbox What You Need Before Starting
Before starting, consult your vehicle’s owner’s manual to verify the exact transmission fluid
specification (e.g., Mercon V, Dexron VI, ATF+4). Using the wrong fluid can permanently ruin internal clutches.
Step-by-Step Transmission Fluid Execution
Prep and Safely Lift the Vehicle
Drive your car for 5 to 10 minutes to bring the transmission fluid up to a warm operating temperature. Warm fluid holds contaminants in suspension and flows much easier. Park on a completely level concrete surface, engage the parking brake, and raise the vehicle using a hydraulic floor jack.
CRITICAL SAFETY WARNING: Never climb underneath a vehicle supported only by a
hydraulic jack. Always lower the vehicle securely onto heavy-duty steel jack stands and place wheel chocks firmly behind the rear tires.
Position the Pan and Loosen the Bolts
Slide underneath the vehicle and locate the flat, rectangular transmission fluid pan. Position your wide catch pan directly underneath it. If your transmission pan has a built-in drain plug, remove it using a socket wrench and allow the bulk of the fluid to drain.
If it does not have a drain plug, you will need to loosen the pan bolts systematically to let the fluid spill over the edge cleanly:
Loosen all the bolts around the pan, but do not remove them entirely. Completely remove the bolts on one side (typically the rear), then slowly undo the remaining bolts on the opposite side to let the pan tilt downward, allowing the fluid to empty into your catch pan without making a massive mess.
Remove the Pan and Clean the Magnet
Once the fluid flow slows to a trickle, support the bottom of the pan with your gloved hand, remove the final bolts, and carefully lower the pan down (it will still contain a layer of heavy fluid). Pour the remaining fluid into your catch pan.
Look inside the transmission pan—you will find a small, flat magnet designed to catch metal particles. Remove the magnet and wipe it completely clean of any dark gray sludge. Clean the entire inside of the pan with a lint-free rag and brake cleaner until it is spotless.
Swap the Internal Transmission Filter
With the pan removed, look upward into the exposed transmission valve body to locate the plastic filter. Pull the old filter straight down (be prepared for an extra splash of fluid).
Coat the rubber seal of your brand-new filter with a drop of fresh transmission fluid, then press the new filter firmly up into the transmission housing until it seats securely.
Install the New Gasket and Reinstall the Pan
Scrape away any old gasket material from the transmission housing mounting surface using a plastic scraper (avoid metal scrapers on aluminum housings to prevent gouging). Place your clean magnet back into its designated slot in the pan.
Lay the brand-new pan gasket onto the clean pan rim. Raise the pan back up to the transmission, and thread the bolts in by hand clockwise to avoid cross-threading. Using a torque wrench, tighten the bolts in an alternating star pattern to the manufacturer’s exact torque specifications (usually very light, around 10 to 14 Nm). Over-tightening will crush the gasket and cause immediate leaks.
Fill with Fresh Transmission Fluid
Locate the transmission dipstick tube under the hood (or the dedicated fill port on the side of the transmission housing if it is a sealed system). Insert a clean, long-neck funnel and pour in the fresh fluid.
Crucial note: Because a drain and fill only removes the fluid in the pan (leaving fluid behind in the torque converter), you will need less fluid than the transmission’s total “dry capacity.” Start by adding roughly 3 to 4 liters, checking your level frequently.
Cycle the Gears and Verify Fluid Levels
Start the engine and let it idle. With your foot firmly on the brake pedal, slowly shift the transmission selector through every single gear position ($P \rightarrow R \rightarrow N \rightarrow D \rightarrow M$) holding it in each gear for 5 seconds to route the fresh fluid through the internal hydraulic circuits. Place the car back in Park and let it idle.
With the engine still running and idling in Park, pull the transmission dipstick, wipe it clean, reinsert it fully, and pull it out. The fluid level must sit within the designated “Cold” mark if the car is just warming up, or the “Hot” mark if it has reached full operational temperature. Top up in tiny increments if necessary.
The Critical Alignment and Steering Link Framework
Because servicing your transmission fluid requires raising your car completely off the ground and spending significant time under the chassis, it provides the perfect opportunity to inspect your underlying suspension components, steering links, and tire structures.
While under the car, take a close look at your inner and outer constant velocity (CV) boots for rips or grease leaks, and evaluate your tire tread patterns. If you notice your front tires are scrubbing away their rubber unevenly, pairing your drivetrain fluid change with a computerized wheel alignment is a highly recommended preventive step. Realigning your suspension back to factory specifications eliminates steering wheel drift, improves highway tracking, and stops premature tire wear.
Comprehensive Automotive Solutions
Maintaining an automobile requires looking at the vehicle as a fully integrated ecosystem. If you run into unexpected mechanical hurdles while working on your car, or simply prefer to hand the messy cleanup over to a professional, an independent garage can provide completely seamless preventative care.
A premier, full-service workshop handles everything required to keep your automobile dependable and safe. If your brakes are squealing or displaying a soft pedal feel, a comprehensive brake repair service will fully restore your stopping confidence. If your vehicle is exhibiting complex running issues, licensed technicians can pinpoint the exact wheel sensor or wiring issue triggering an ABS light or check engine alert.
From restoring crisp, icy airflow with an expert air conditioning service to tracking down complex mechanical faults, comprehensive care saves time. If your manual gearbox is fighting your inputs up steep hills, a specialized clutch repair balances your power delivery. Furthermore, for high-mileage engines, booking a preemptive timing belt repair provides absolute insurance against catastrophic internal engine valve damage.
Drivetrain Longevity and Total Peace of Mind
Stretching out your transmission maintenance intervals or driving on burnt, oxidized fluid leaves your gearbox vulnerable to internal clutch slippage, hard shifting, and expensive mechanical failures. Investing a bit of time or booking a professional fluid and filter exchange completely clears away abrasive metal particles, keeps your gear shifts crisp and predictable, and ensures your daily commutes remain worry-free.
Frequently Asked Questions: how do you change transmission oil
What is the main difference between a wheel alignment and tire balancing?
A wheel alignment corrects the underlying mechanical angles of your steering links and suspension components so that your tires roll parallel to each other and track straight. A professional tire repair service incorporates wheel balancing, which places small weights along the rim flange to correct natural heavy spots within the spinning rubber assembly itself, entirely removing high-speed steering vibrations.
Why is transmission fluid bright red?
Manufacturers dye automatic transmission fluid a bright, distinct translucent red purely for easy identification. This helps vehicle owners and mechanics instantly distinguish a transmission leak from other automotive fluids, like engine oil (amber to black) or coolant (typically green, blue, or pink).
What should I do if my transmission pan gasket doesn’t use bolts but liquid RTV sealer?
Many modern vehicles utilize liquid silicone RTV gasket maker instead of a physical rubber or cork gasket. If your car uses RTV, you must apply a clean, continuous $1/8\text{-inch}$ bead of oil-resistant RTV silicone around the pan rim, circle around every bolt hole, and let it cure for at least an hour before adding fresh fluid.
Can I change transmission fluid on a vehicle with 300,000 kilometers that has never been serviced?
If a transmission has been severely neglected for hundreds of thousands of kilometers, a gentle “drain and fill” is safe, but a high-pressure machine flush should be completely avoided. A heavy flush can dislodge old, hardened sludge deposits and push them deep into the tiny fluid passages of the valve body, causing the transmission to fail shortly after.
How do I safely dispose of old transmission fluid?
Just like engine oil, used transmission fluid is classified as hazardous environmental waste. Pour your dirty fluid into an empty, sealed plastic jug and take it along with your old filter to a local automotive recycling depot or an auto parts store, where they will safely collect it for recycling at no cost.
Why does the engine have to be running when checking transmission fluid?
Engine oil is checked with the engine off so all fluid drains down into the oil pan. Transmission fluid, however, must be checked with the engine running because the internal fluid pump needs to be actively filling the torque converter, valve body, and hydraulic circuits to give you an accurate operational fluid reading on the dipstick.
Key Takeaways: how do you change transmission oil
- Warm Fluid Flows Best: Drive your car for 10 minutes before draining to warm the fluid, allowing it to pull away more internal debris.
- Clean the Internal Magnet: Always wipe down the pan’s internal magnet to remove the fine metallic sludge that naturally accumulates over time.
- Watch the Filter O-Ring: Ensure the old filter’s rubber seal comes out of the housing bore to avoid an engine-starving double O-ring mistake.
- Check with the Engine Running: Always check your final transmission fluid dipstick level while the engine is running and idling in Park.
- Chassis Geometry Alignment Link: Raising your vehicle for transmission care is the ultimate opportunity to look at steering links, making an alignment highly efficient if uneven tire wear is discovered.
- Independent Workshop Safety Nets: If dropping a fluid pan feels too messy or complex, a local independent garage can handle the entire service using factory-approved fluids quickly and cleanly.